Sunday, February 28, 2010
It snowed... a lot
Sunday, February 14, 2010
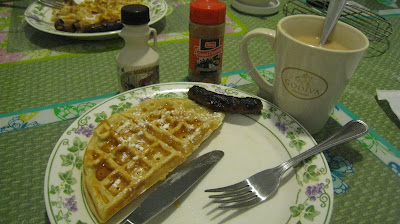
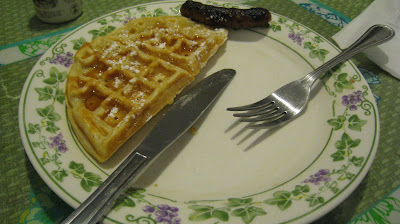
Snow Day = Brunch Time


3 Tbsp Baking Powder
2 Tbsp Sugar
2 cups Milk
2 whole Large Eggs
3 tspVanilla
4 Tbsp Butter
Mix together dry ingredients in large bowl. Add milk, eggs, vanilla and melted butter. Stir gently until just combined.
Place batter in waffle maker and cook according to waffle maker instructions, or until waffles are golden brown. Our belgian waffle maker used ~1 cup batter per round of waffles, and each waffle took about 7-8 minutes to cook fully (but I kept on opening up the waffle maker to check the waffles, as the waffle maker doesn't have a 'done' light or timer). Note that the batter puffs up quite a bit during cooking, so don't overfill the waffle maker, or it will overflow or puff up so that the waffle maker doesn't fully close (the latter happened to us).
Serve with maple syrup, butter and powdered sugar

Wednesday, February 10, 2010
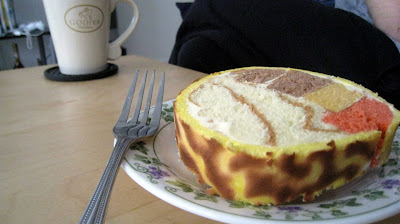
Roll cake is a glorious confection

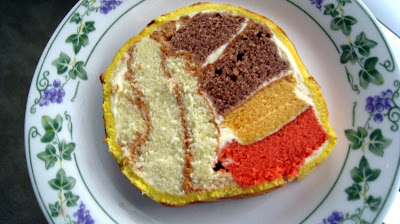
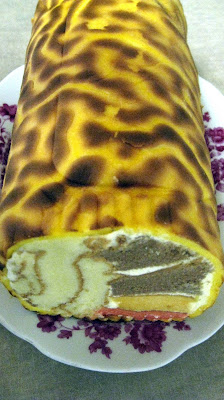
Due to the dire warnings of impending blizzard doom (or 'Snowmageddon', as I heard it referenced as on the news multiple times) this past weekend, we did a large grocery shopping trip last Thursday to make sure we wouldn't starve during the storm. One of the stores we went to was the Kam Sam supermarket in Rockville. Our originial purpose in going there was to replenish our stash of pork ribs, but (somewhat predictably), I was purusing the bakery section when I saw the perfect breakfast for the weekend- roll cake! And not just any roll cake, but tiger roll cake!! I have always been a fan of roll cake, which is a sponge cake that is formed into a swiss roll, with a cream filling (commonly buttercream) holding the swiss roll together. It can be either baked or steamed. Both are good, but I prefer baked, as the cake will get a light crust and golden brown coloring on the outside, which is both aesthetically pleasing and tasty. It is light, not too sweet, and delicious in the morning with tea. Sometimes the roll cake is chocolate, or even matcha flavored, but we have always been traditionalists and gone with good old vanilla. That is, until this particular supermarket visit, where I saw a roll cake that had some sort of covering that looked like an egg dough that had been seared or something similar to get the dark 'tiger' pattern on it (I have been unable to find instructions on how to get the tiger roll skin so far online). In truth, the pattern was more leopard than tiger, but that is irrelevant, as it was pure awesome! Inside, the cake wasn't a swiss roll, but a combination of a variety of different sponge cakes, all held together with the ubiquitous and delicious cream filling. This particular tiger cake was made up of vanilla, chocolate, strawberry and orange cakes. I like to pick it apart and eat all the flavors separately, but that's just my preference.

Saturday, February 6, 2010
Beef Noodle Stir Fry

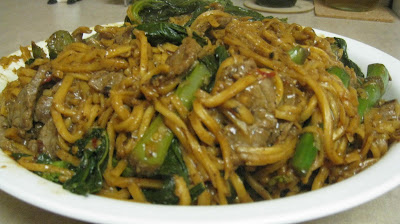
If we were marooned on a desert island with only one carb choice, we'd be sitting under a palm tree eating rice for the rest of eternity. Not to say that we don't love noodles (and I have much love for some quality pad see ew), but the only time we eat noodles in a dinner we make at home is probably for wonton noodle soup, or the occasional spaghetti and meatballs. We've tried stir frying noodles before, and we ended up with a gummy ball of noodles that had congealed together and were not easy at all to cook. So as a general rule, we try to leave the whole noodle thing to the pros, and stick with our trusty and reliable rice cooker. However, we saw this recipe posted on the Steamy Kitchen blog, and decided to give stir fried noodles another go.
With our last noodle dish (read: the godzilla sized ball of cemented together noodles with some meat and veggies stuck on the outside), we used dried rice noodles- vermicelli- and had boiled them briefly, then stuck them in the wok to finish cooking. To minimize the chances of this happening again, we used frozen cooked egg noodles this time, which we could just thaw and dump into the wok.
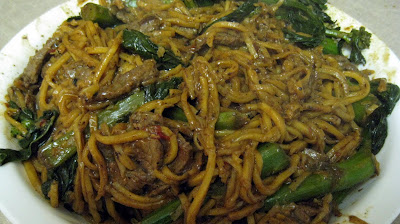
There are a few things we will do differently next time. First, the recipe does not have you chop up the gai lan (chinese broccoli), but rather has you cook it whole. I would prefer to chop up my gai lan into 3" segments (like we do with yu choy), which are easier to pick up, a lot easier and less messy to eat, and also make the dish seem to have more veggie in it. While we did put a full pound of gai lan in this dish, it is only 10 or so stalks, so it is impossible to get portions of veggie in every bite. And each stalk is on the large size, so it is kind of like eating a never ending spaghetti noodle, except 10 times as big and dripping with sauce. Also, it takes longer to have the intact gai lan steam in the wok due to the size of the stalks. All these issues would be eliminated by chopping up the veggie. Second, the sauce did not have much flavor to it- it fell flat. We punched it up by adding some chilli garlic sauce, and that gave it some kick. Third, we felt that this stir fry would benefit from some other additions, like scramble egg, or mushrooms. Perhaps it was from the fact that the gai lan wasn't chopped up, but there were a lot of bites of just noodle, where you wished there was something else in there.

This recipe makes enough for two generous dinner servings. We had enough for a dinner for two, plus a small amount left over for a lunch for one the next day. Overall, we thought this dish was pretty tasty.
Beef Noodle Stir Fry
(adapted from: http://steamykitchen.com/4997-broccoli-beef-noodle-stir-fry.html)
3 tablespoons soy sauce3 tablespoons oyster sauce
3 tablespoons Shaoxing wine
1 tablespoon sugar
1 tablespoon cornstarch
1 teaspoon dark sesame oil
1/2 pound beef sirloin, thinly sliced
1 pound fresh noodles
2 tablespoons vegetable oil
3 large garlic cloves finely chopped
1 1/4 cups chicken or vegetable stock
1 pound gai lan
Ground black pepper
Chilli Garlic sauce (we used Lee Kum Kee brand) to taste (a few tsp)
In a medium bowl, whisk together 1 tablespoon each soy sauce, oyster sauce and rice wine. Add the sugar and continue to whisk until completely dissolved. Stir in the corn starch and continue stirring until smooth. Add the sesame oil and beef, and mix well. Marinate for 20 minutes. Drain and discard the excess marinade.Heat 1 tablespoon of the vegetable oil in a skillet or wok over high heat and stir-fry the garlic until fragrant, about 1o seconds. Add the beef and stir-fry until tender, 1 to 2 minutes. Transfer to a plate. Add the remaining tablespoon of oil and when hot, add the Chinese broccoli, stir frying so that the oil coats the Chinese broccoli. Pour in the 1/4 cup of the stock, turn the heat to medium-low and cover with a tight fitting lid. Cook the Chinese broccoli until tender, 3 to 5 minutes. Transfer the Chinese broccoli to the same plate.
Add the remaining cup of stock and the remaining 2 tablespoons each of soy sauce, oyster sauce, and rice wine to the same skillet and bring to a boil overhigh heat.Saturday, January 30, 2010
Happy Birthday Rachel!
Hainanese Chicken Rice
I, for one, am a huge devotee of the chili ginger sauce, and have been known, on occasion, to try and scoop as much sauce as I can onto each piece of chicken, and then drain the last of the sauce dish into my rice so not a drop goes to waste. It is spicy, gingery and addictive. Don't say I didn't warn you!
We have made Hainanese chicken rice several times, and we think that this version is the best (from the Steamy Kitchen blog- http://www.steamykitchen.com/- a great site!). It is the addition of the aromatics in the rice that takes it up to the next level.
adapted from: http://steamykitchen.com/5068-hainanese-chicken-rice.html
Salt
4 inch section of fresh ginger, in 1/4 inch slices
2 green onions, cut into 1″ sections (both the green and white parts)
1 teaspoon sesame oil
3 tbsp vegetable oil
3 cloves garlic, finely minced
1 inch section of ginger, finely minced
6 cups uncooked jasmine rice, rinsed
6 ½ cups reserved chicken poaching broth
½ teaspoon sesame oil
1 teaspoon salt
CHILI SAUCE
1 tablespoon lime juice
2 tablespoon reserved chicken poaching broth
2 teaspoon sugar
4 tablespoon chili garlic sauce (we used Lee Kum Kee brand)
4 cloves garlic
1 inch
a generous pinch of salt, to taste
1 cucumber, sliced
Directions

Sunday, January 24, 2010
Mamma Mia, that's a tasty pizza!

The recipe we use is originally from allrecipies.com, but it is tweaked a little bit based on our tastes/preferences. This recipe does not require a long rising time for the dough, but in the multiple times we've made it, we've realized that the pizza turns out better if you let the dough rise- it's easier to roll out to a larger size, and the crust is lighter and more airy (note: the end result without the rise time is not bad- the alternative is just better). We have also tried different cooking methods regarding the pizza stone. I know that in 'real' pizza making, you are supposed to heat up the pizza stone first and then put the pizza on the searing hot stone to achieve a really crispy crust, etc, but without a pizza peel, it is extremely difficult (in my opinion/experience) to slide a pizza, complete with toppings, from a baking sheet or other surface onto a hot pizza stone in your low to the ground oven. In the times that I tried, the pizza inevitably had at least one gaping hole torn in it, and the toppings clumped together in different sections of the pizza, ruining my carefully arranged pizza. DRAT! The end result was not bad eating, but was ugly as sin. DRAT DRAT! And I didn't even think that the crust was crispier or better than when I just roll the pizza out and put it and the stone into the preheated oven all at once. The only difference is that perhaps the crust gets a little bit better color on it. Not worth the hassle, in my opinion. Maybe a pizza peel would make it easier, but I can't imagine any scenario where I can take a pizza, weighted down with sauce and toppings, and easily transfer it to the oven without destroying it- there is always at least one part of the dough that insists on sticking to the surface it's resting on.
Pepperoni used to be our go to meat topping, but lately, we've realized that cut up sausage (breakfast style or italian) are also delicious! Green peppers make a regular appearance. What I really like about this pizza are the herbs in the crust itself- it tastes great, and makes it smell even better. The chunks of tomatoes in the sauce, rather than a completely pureed texture sauce, is also a plus in my book. And of course- don't ever skimp on the cheese!!
The sauce recipe makes enough for two pizzas, so we usually make a complete batch, and then freeze half for the next time we make pizza. In a true display of our love for getting our money's worth out of everything, we have also found that you can freeze cheese quite nicely. For instance, we purchase the pre-shredded cheese packages (usually about 2 1/2 cups per package). Our typical pizza (~10 inches), maybe uses 1/3 of this package. Since we're not avid cheese easters, the leftover cheese usually goes to waste- perhaps making it into a toasted cheese sandwich or two. So freezing it really comes in handy! You might also be intrigued to learn that tomato paste also freezes well.
Pizza Crust (adapted from http://allrecipes.com/Recipe/Quick-and-Easy-Pizza-Crust/Detail.aspx)
Ingredients
- 1 (.25 ounce) package active dry yeast
- 1 teaspoon white sugar
- 1 cup warm water (110 degrees F/45 degrees C)
- 2 1/2 cups bread flour (don't use AP)
- 2 tablespoons olive oil
- 1 teaspoon salt
- 1/2 tsp basil, 1/2 tsp oregano, 1/4 tsp onion powder (or 1/2 tsp dried minced onion), 1/2 tsp garlic powder
Directions
- In a medium bowl, dissolve yeast and sugar in warm water. Let stand until creamy, about 10 minutes.
- Stir in flour, salt, herbs and oil. Beat until smooth.
- Place in a large bowl, cover with a towel and let rise in a warm place for a few hours (I typically make the dough mid-morning, and bake the pizza around 6pm). Alternatively, you can make the dough and immediately roll into a round and bake, if desired.
Pizza Sauce (adapated from
http://allrecipes.com/Recipe/Pizza-Sauce-and-Dough/Detail.aspx)
Ingredients
- 1 tablespoon olive oil
- 1/4 cup chopped onion
- 1 tablespoons chopped garlic
- 1 (14 ounce) can roma tomatoes, with juice
- 1 (6 ounce) cans tomato paste
- 1/2 tablespoon basil
- 1/2 tablespoon parsley
- 1/2 teaspoon oregano
- 1/4 teaspoon black pepper
Directions
- Heat olive oil in a saucepan over medium heat. Saute onions until tender.
- Stir in garlic, and cook for 1 minute. Crush tomatoes into saucepan.
- Add tomato paste, basil, parsley and oregano. Simmer for 10 minutes.
To Make the Pizza:
- Preheat oven to 450 degrees F (230 degrees C).
- Turn dough out onto a lightly floured surface, knead for a few minutes, and pat or roll into a round. Transfer crust to a pizza stone dusted with cornmeal.
- Spread with desired toppings and bake in preheated oven for 15 to 20 minutes, or until golden brown. Let baked pizza cool for 5 minutes before serving.